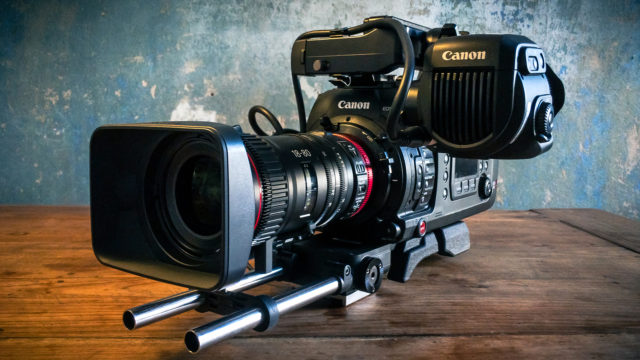
The EOS C700 itself is a cuboid of 16.7 x 15.4 x 32.7 cm and it weighs 3.4kg. That’s not bad at all! When fully rigged it gets heavier, obviously, but the form factor allows is to sit on your shoulder without having to modify it completely. My own C300 Mark II tells a different story here. Without excessive use of accessories you can’t use it as a shoulder mounted camera.
Still, the C700 is quite a big camera and I’d love it to be a little shorter and lighter than it actually is. The closest competitor to the C700 might be the ARRI Amira, which is actually super heavy. The camera alone weighs 4.1 kg but fully rigged it is a torture to work with it from the shoulder over a long period of time. But maybe that’s just me.
The camera body’s top and bottom consists of a full-seized cheeseplate with tons of 1/4″ and 3/8″ threads. This makes the camera super flexible when it comes to rigging it up for a specific shoot.
A choice of EF or PL mount is to be made when you purchase this camera. The model I’ve got from Canon came with a positive lock active EF mount which is indeed really good. There’s no play whatsoever and the mount holds the lens very tight. Plus, you don’t have to rotate the lens when attaching it to the C700 since the mount itself rotates.
If you’re in the market for a reliable broadcast camera but with advanced color-science and dynamic range, the C700 in conjunction with the optional B4 lens adapter might be a thing. With it, standard 2/3″ ENG lenses can be attached to the EOS C700. I haven’t tried that one, though.
Audio and Connectivity
In terms of connectivity, the EOS C700 offers everything you’ll ever need. Four SDI outputs, two additional monitor outs (again: SDI), a dedicated proprietary connector for the Canon EVF-V70 OLED viewfinder. Each and every output can be configured to your specific needs. Viewfinder overlays, LUTs, magnifying, focus assists, it’s all there (or not, whatever suits your workflow best).
A full-fledged audio section with everything you need in one place. The XLR inputs, the headphone out, TC in and the mic-line switches are located next to each other. With a lot of other cameras you have to bend audio cables across the whole body of the given camera because the connectors are all over the place. Scratch audio can be recorded to track 3/4 via an internal mic. That’s not for broadcast quality, of course, but having a referene track for syncing up external audio to your footage is super helpful.
